Introduction
This manual is intended to help user to configure Gentoo distribution of the GNU/Linux operating system for One-Netbook A1 handheld computer. It’s supposed that user is skilled enough to install bare system from stage, compile kernel from source code, apply patches, etc.

Despite the fact that the manufacturer claims Linux support on the product description page, to my knowledge there is no Linux distribution, which actually supports the device out of the box. Therefore I hope that this manual will be useful for some A1 owners.
This article and all information and products in it are provided on an "as is" basis, without warranty of any kind, either express or implied. Your use of this article is at your own risk.
Content
Hardware info
Brief hardware description from the manufacturer: One-Netbook A1 | One-Netbook.
| Type |
Name |
Technical info
|
| CPU |
Intel® Core™ m3-8100Y (Amber Lake) |
Base frequency: 1,1 GHz; Max frequency: 3.4 GHz; 2 cores, 4 threads; TDP: 5W; Features: x86-64, SSE4.2, AVX2, AES, IVT; L2 cache: 4MB. [1], [2], [3] |
| RAM |
SK Hynix? |
8GB single channel, LPDDR4; Bus clock: 1600 Mhz |
| Video |
Intel UHD Graphics 615 (Amber Lake) |
EU: 24, Clock speed: 300-900 Mhz; GFLOPS: 345.6; OpenGL support: 4.6; Multimedia codecs [4] : MPEG-2, MPEG-4, AVC, VC-1, WMV9, HEVC, HEVC 10-bit, VP9, VP9 10-bit, JPEG. Device id: 8086:591c (rev 02); [5], [6], [7], [8] |
| Storage device |
One-Netbook PCI-E 256G M.2 NVME SSD |
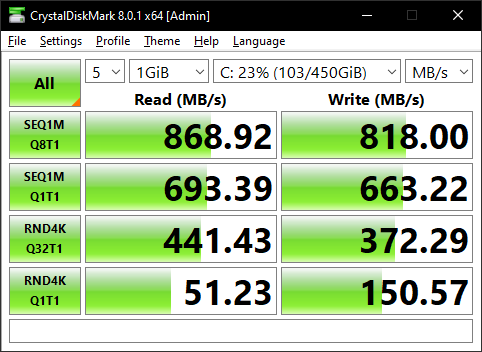
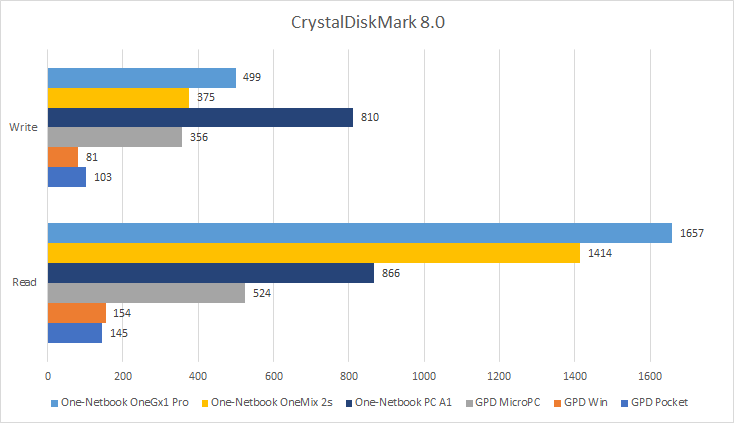
Capacity: 256GB; Seq. R/W speed: 866/810 MB/s; |
| Audio |
Realtek Semiconductor Co. ALC269VC |
4 channels, 24-bit I/O; DAC max sample rate: 192kHz; EAX 1.0 & 2.0, Direct Sound 3D, A3D; Device id: 8086:9d71 [9] |
| Ethernet |
Realtek Semiconductor Co. RTL8111/8168/8411 |
Speed: 10/100/1000 MB/s; Device id: 10ec:8168 (rev 15); [10] |
| WiFi & Bluetooth |
Intel® Dual Band Wireless-AC 7265 |
Bands: 2.4GHz, 5GHz; Protocols: 802.11ac; Max speed: 867 Mbps; Bluetooth Version 4.2; PCI Device id: 8086:095a (rev 59); USB Device id: 8087:0a2a; [11] |
| Card reader |
Alcor Micro Corp. Multi Flash Reader |
Device id: 058f:6366; |
| Accelerometer |
Bosch BMC150 |
|
| Optical pointer |
HAILUCK CO.,LTD USB KEYBOARD Mouse |
Device id: 258a:0021 |
| Digitizer |
Goodix GXTP7386 |
Device id: 27c6:0113, compatible with Microsoft Surface Pen |
| Fingerprint reader |
Focaltech FTE3600 |
Connected via SPI bus |
References
- Intel® Core™ m3-8100Y Processor Product Specifications
- Core M3-8100Y – Intel – WikiChip
- Intel Core m3-8100Y SoC – NotebookCheck.net Tech
- Encode and Decode Capabilities for 7th Generation Intel® Core™ Processors and Newer
- Intel Graphics Technology – Wikipedia
- List of Intel graphics processing units – Wikipedia
- Amber Lake – Microarchitectures – Intel – WikiChip
- Intel UHD Graphics 615 Specs | TechPowerUp GPU Database
- ALC269 HIGH DEFINITION AUDIO CODEC WITHE MBEDDED CLASS-D SPEAKER AMPLIFIER DATASHEET
- RTL8168 INTEGRATED GIGABIT ETHERNET CONTROLLER FOR PCI EXPRESS APPLICATIONS DATASHEET
- Intel® Dual Band Wireless-AC 7265 Product Specifications
Logs
Linux support summary
| Subsystem |
Feature |
Status |
| Input |
Keyboard |
Works perfectly |
|
Optical pointer |
Works perfectly |
|
Touchscreen |
Works perfectly |
|
Digitizer |
Works perfectly |
|
Digitizer pen buttons |
Works perfectly |
| Video |
Integrated display |
Works perfectly |
|
2D graphics |
Works perfectly |
|
3D acceleration |
Works perfectly |
|
Video decoding acceleration |
Works perfectly |
|
HDMI output |
Minor issues |
| Audio |
Internal speaker |
Works perfectly |
|
Microphone |
Works perfectly |
|
Audio out jack |
Works perfectly |
|
Headphones mute speaker |
Works perfectly |
| Networking |
Ethernet |
Works perfectly |
|
WiFi |
Works perfectly |
|
BlueTooth |
Untested |
| ACPI |
Lid button |
Works perfectly |
|
Power button |
Works perfectly |
|
Brightness control |
Works perfectly |
|
AC and battery |
Works perfectly |
| Power management |
Suspend to RAM |
Works perfectly |
|
Suspend to disk |
Works perfectly |
|
CPU frequency scaling |
Works perfectly |
| Other |
microSD card reader |
Works perfectly |
|
Fingerprint reader |
Not supported |
Kernel
The kernel config for version 5.10.27 is available here. Few notes regarding the kernel config:
- It’s optimized for One-Netbook A1. Most options not required by this device are turned off. The total number of enabled options is 1092, the size of the compiles binary image is just 8.9M. You may need to enable additional options like filesystems or drivers for peripheral devices.
- This config produces monolith kernel, which does not require any modules, firmwares or even a command line. But prior building this kernel you need install the firmware files, which are provided by these two packages:
sys-kernel/linux-firmware. In order to install only the firmware files which are relevant for One-Netbok A1, enable these two USE flags: redistributable savedconfig and save this file as /etc/portage/savedconfig/sys-kernel/linux-firmware/linux-firmware.confnet-wireless/wireless-regdb
- Mitigation of Spectre and Meltdown vulnerabilities is disabled (
CONFIG_PAGE_TABLE_ISOLATION). Consider for yourself what is more important for you: performance of security.
- This config assumes that nvme0n1p7 is the root partition and nvme0n1p6 is the swap partition. If your partition layout is different, you will need to edit these parameters:
CONFIG_CMDLINE="root=/dev/nvme0n1p7 fbcon=rotate:3 i915.lvds_downclock=1 i915.i915_enable_fbc=1 i915.i915_enable_rc6=1 i915.enable_psr=1 quiet"CONFIG_PM_STD_PARTITION="/dev/nvme0n1p6"
- The latest upstream kernel does not support the Goodix digitizer properly. In order to make the digitizer and the stylus work as expected, you need to apply two patches: [1], [2]. See this discussion for details: UPD: hid-multitouch: goodix: hovering works as touch.
In case the following error occurs during the kernel compilation: drivers/hid/hid-multitouch.c:2293:4: error:‘I2C_DEVICE_ID_GOODIX_0113’ undeclared here (not in a function);, add the following line to the file drivers/hid/hid-ids.h:
#define I2C_DEVICE_ID_GOODIX_0113 0x0113
Booting the kernel
Since the described kernel does not require a command line, you can boot it directly from the EFI firmware. You no longer need to install and configure a bootloader.
mount /dev/nvme0n1p1 /mnt/boot
cp arch/x86_64/boot/bzImage /mnt/boot/EFI/Boot/bootx64.efi
umount /mnt/boot
efibootmgr -c -d /dev/nvme0n1 -p1 -L 'Gentoo' -l '\EFI\Boot\bootx64.efi'
After that you can make Gentoo the default boot option via editing BIOS setting Boot -> Boot Option Priorities.
There are various xorg input device drivers. libinput is one of them, and it’s the default driver in Gentoo. This driver works fine with A1.
In order to use this driver, set the INPUT_DEVICES variable to ‘libinput’, see make.conf as example.
Keyboard
Down below you can see xorg.conf.d file for the keyboard.
10keyboard.conf
    Section "InputClass"
        Identifier          "keyboard-all"
        Driver              "libinput"
        Option              "XkbRules"                  "evdev"
        Option              "XkbModel"                  "pc105"
        Option              "XkbLayout"                 "us,ru"
        Option              "XkbVariant"                ",winkeys"
        Option              "XkbOptions"                "grp:alt_shift_toggle,terminate:ctrl_alt_bksp"
        MatchIsKeyboard     "on"
        MatchDevicePath     "/dev/input/event*"
    EndSection
Volume and Brightness up/down keys by default generate correct key symbols:
- XF86AudioRaiseVolume and XF86AudioLowerVolume;
- XF86MonBrightnessUp and XF86MonBrightnessDown;
One special keysymbol is added for the Power button – XF86Launch0. The button itself does not generate any keycode. It’s handled by ACPI subsystem, which generates proper key code for XF86Launch0. The .Xmodmap binds the special key code to XF86Launch0.
All we need to do is to assign proper actions to the symnames. The rc.xml is an example of such bindings. This configuration file has some additional key binding, which you may find interesting:
- Alt+d– Toggles DPMS state of connected displays via xset. See dpms.sh for details.
-
Power shows an information dialog (tray.sh), which contains current time and date, battery status and level, brightness, CPU frequencies and governors, etc.
        03.05 Monday 20:24

MPD Stopped
Battery: Charging, 87%, 63:42:51 until charged
Brightness: 100
Temp: CPU 54|52°C, SSD 24°C, WiFi 38°C
Freq: 2.72GHz|2.70GHz, performance
RAM: 87% free
Network: eth0 wlan0, wireless is on
The fan switch is 100% hardware and does not generate a scancode, ACPI or udev event.
The keyboard backlit is also 100% hardware and does not require any software configurations.
Touchscreen
Down below you can see xorg.conf.d file for the touchscreen.
21touchscreen.conf
    Section "InputClass"
      Identifier    "Goodix Touchscreen"
      MatchProduct  "GXTP7386:00 27C6:0113"
      Option        "TransformationMatrix"        "0 -1 1 1 0 0 0 0 1"
    EndSection
If you want to change the touchscreen orientation automatically, see the Accelerometer section.
Digitizer & Stylus
The digitizer GXTP7386 does not work out of the box with the kernel version 5.10.27. The default hid-multitouch driver processes hovering as touch. In order to make the digitizer work as expected, you need to apply two patches mentioned in the Kernel section. Thanks to Dmitry Mastykin, who provided these patches. These patches fix the hovering issue and make pen buttons work as right and middle mouse buttons.
Down below you can see xorg.conf.d file for the digitizer.
22pen.conf
    Section "InputClass"
      Identifier    "Stylus"
      MatchProduct  "GXTP7386:00 27C6:0113 Stylus Pen (0)"
      Option        "TransformationMatrix"        "0 -1 1 1 0 0 0 0 1"
    EndSection
Pressure sensitivity also works fine as demonstrated on the screenshot below.

Virtual keyboard
I case you want to use a virtual keyboard, consider matchbox-keyboard.
The custom ebuild with the lastest version of the program is available here: matchbox-keyboard-999999.ebuild.
I use a custom keyboard layout. which is displayed on the screenshot below. The layout config file is here: keyboard.xml.
This keyboard works best with special settings of windows manager. In case you use OpenBox I recommend the following settings:
<applications>
  <application class="matchbox-keyboard">
    <decor>yes</decor>
    <layer>above</layer>
    <position>
      <x>center</x>
      <y>-0%</y>
    </position>
    <size>
      <height>30%</height>
      <width>100%</width>
    </size>
    <skip_pager>no</skip_pager>
    <skip_taskbar>no</skip_taskbar>
  </application>
</applications>
A desktop panel is very useful when the hardware keyboard is hidded. For example, it can be used to toggle the virtual keyboard. It looks like the device does not include a sensor to detect that the device is converted into tablet mode (please let me know if I’m wrong). Therefore I configured the autorotation script to launch the desktop panel (I prefer lxpanel) when the device is rotated. See the Accelerometer section for details.
Here is my config file for lxpanel. And here is the script I use to toggle the virtual keyboard: toggle_keyboard.sh.

Video
Kernel
The native orientation of the integrated display is portrait. Therefore the framebuffer console needs to be rotated. In order to configure correct orientation, add ‘fbcon=rotate:3’ to the kernel command line:
CONFIG_CMDLINE="root=/dev/nvme0n1p7 fbcon=rotate:3 i915.lvds_downclock=1 i915.i915_enable_fbc=1 i915.i915_enable_rc6=1 i915.enable_psr=1 quiet"
The following options improve power saving: i915.lvds_downclock=1 i915.i915_enable_fbc=1 i915.i915_enable_rc6=1 i915.enable_psr=1.
X11 configuration
The VIDEO_CARDS variable should be set to ‘intel i965’. The global USE should include ‘dri’, see make.conf as example.
The modesetting driver (which is built into xorg-server) works fine, therefore it’s safe to get rid of the old xf86-video-intel driver. Down below you can see xorg.conf.d files for the UHD graphics.
30device.conf
    Section "Device"
      Identifier    "Intel Graphics"
      Driver        "modesetting"
      Option        "AccelMethod"            "glamor"
      Option        "DRI"                    "3"
    EndSection
40monitor.conf
    Section "Monitor"
      Identifier    "eDP-1"
      Option        "Rotate"                 "left"
      Option        "Primary"                "true"
    EndSection

    Section "Monitor"
      Identifier    "HDMI-1"
      Option        "Disable"                "true"
    EndSection

    Section "Monitor"
      Identifier    "DP-1"
      Option        "Disable"                "true"
    EndSection
DPI & scaling
It’s very easy to set correct DPI for the built-in display. Just add the following line to your ~/.Xdefaults:
Xft.dpi: 144
However, this option will affect all displays connected to the device. If you you external display, you may want to set different DPI.
One way to solve this issue is to use xrandr with the --scale option, for example:
xrandr --output eDP1 --scale 0.75x0.75
However, this will make the image a bit blurry. Please let me know if there is a way to set different DPI without blurring the image.
Here is a nice wrapup of the current X Server capabilities of handling mixed DPI: Mixed DPI and the X Window System.
Backlight
xbacklight currently does not work with the modesetting driver issue #47. The project acpilight provides a xbacklight drop in replacement which addresses the issue. In Gentoo this tool is provided by sys-power/acpilight.
Normally, users are prohibited to alter files in the sys filesystem. It’s advisable (and recommended) to setup an "udev" rule to allow users in the "video" group to set the display brightness. To do so, place a file in /etc/udev/rules.d/90-backlight.rules containing:
    SUBSYSTEM=="backlight", ACTION=="add", \
      RUN+="/bin/chgrp video /sys/class/backlight/%k/brightness", \
      RUN+="/bin/chmod g+w /sys/class/backlight/%k/brightness"
to setup the relevant permissions at boot time. These rules are very conservative: only the display brightness can be controlled, and nothing else. Do not set suid permissions on xbacklight.
HDMI output
HDMI output is supported by intel driver. You can use video-out.sh utility to toggle the HDMI output (via xrandr). The utility installs the external screen to the right of built-in screen. See the source code of video-out.sh for details.
3D acceleration
There are two available drivers: xf86-video-intel (obsolete driver) and the modesetting driver built into xorg-server (recommended).
The first one is significantly faster. glxgears shows approximately 5000 FPS using xf86-video-intel vs 3800 FPS using the modesetting driver.
However, xf86-video-intel is not recommeded by Gentoo commutiny, because this driver is obsolete and is no longer maintained by Intel. If you decide to use xf86-video-intel, you will need to update the X11 output name in xorg configuration files and the scripts like video-out.sh. xf86-video-intel provides eDP1, DP1, etc., while the modesetting drivers provides eDP-1, DP-1, etc. for the same outputs.
DRI works fine with default parameters.
The current modesetting driver from xf86-video-intel-1.20.11 with mesa-20.3.5 supports OpenGL-4.6. See glxinfo for details.
Video decoding acceleration
Intel UHD Graphics 615 is able to decode a wide range of multimedia codecs [4]. The config parameters below describe how to enable hardware decoding via VA-API.
The global USE should include ‘vaapi’.
Custom USE flags:
    x11-libs/libva drm utils
    media-video/libva-utils drm vainfo
    x11-libs/libva-intel-media-driver set-as-default
Unmask the following packages:
    x11-libs/libva ~amd64
    x11-libs/libva-intel-driver ~amd64
    media-video/libva-utils ~amd64
Besides libva, you need a media player, which supports VA-API. You can use ‘mpv’, which does the job fine (except 4k ,see detail below). In this case, add the following config parameters to your mpv.conf
    vo=vaapi
    hwdec=vaapi-copy
You can check if hardware is configured properly by analyzing mpv output:
    Resuming playback. This behavior can be disabled with --no-resume-playback.
     (+) Video --vid=1 (*) (h264 1920x804 24.000fps)
     (+) Audio --aid=1 --alang=rus (*) (dts 6ch 48000Hz)
    Using hardware decoding (vaapi-copy).                         <<<--- THIS
    AO: [alsa] 48000Hz stereo 2ch float
    VO: [gpu] 1920x804 nv12
    AV: 00:00:24 / 02:00:38 (0%) A-V:  0.000
    Saving state.
or by viewing output of vainfo.
See also Components and Features of Intel(R) Media Driver for VAAPI.
I could not make mpv play 4k video on A1 smoothly despite the fact that hardware decoding seems to be working fine. If you want to play 4k video on A1 (using external display, for example), I recommend vlc. It plays 4k video flawlessly on A1.
Accelerometer
One-Netbook A1 has a built-in accelerometer Bosch BMC150. It can be used to change screen orientation automatically. If you are interested - read this section.
First of all, you need to install custom ebuild iio-sensor-proxy-2.0.ebuild, which provides iio-sensor-proxy daemon with optional systemd dependency.
Download the content of iio-sensor-proxy to /usr/local/portage/sys-apps/iio-sensor-proxy and install the package:
    cd /usr/local/portage/sys-apps/iio-sensor-proxy
    ebuild iio-sensor-proxy-2.0.ebuild digest
    emerge -av iio-sensor-proxy
Add iio-sensor-proxy to the default run level:
rc-update add iio-sensor-proxy default
Download autorotate.sh to /usr/local/bin and setup the relevant permissions:
chmod a+x /usr/local/bin/autorotate.sh
autorotate.sh is a small and dirty daemon written in Bash. You need to make it start when X11 session starts. If you use openbox WM, just add the following line to your ~/.config/openbox/autostart.sh:
/usr/local/bin/autorotate.sh &
That's it. Restart X11 session and your screen, touchscreen and digitizer orientation will adjust automatically with the device orientation.
Sound
Supported by CONFIG_SND_HDA_INTEL. I recommend to compile alsa-lib with all plugins (ALSA_PCM_PLUGINS, see make.conf as example).
In general ALSA supports the Realtek ALC269 quite well: both internal speaker and mic work fine as well as headphones jacks. ALSA mutes the speaker when headphones jack is used.
Networking
Ethernet
Supported by CONFIG_R8169. Requires firmware rtl_nic/rtl8168h-2.fw. Configured via default gentoo net config. Here is an example of eth0 definition with static IP. See Gentoo Network Configuration for details.
ethtool may be used to detect whether ethernet cable is plugged or not.
WiFi
WiFi is also supported by kernel (CONFIG_IWLWIFI). The driver requires binary firmware iwlwifi-7265D-29.ucode.
WiFi connection can be configured via wpa_supplicant. See Wireless Networking for details.
The iwl driver supports power management, which is enabled by default. You can check whether power management is turned on using iwconfig:
    wlan0     IEEE 802.11  ESSID:"hs"
              Mode:Managed  Frequency:5.18 GHz  Access Point: 04:F0:21:1B:63:46
              Bit Rate=780 Mb/s   Tx-Power=22 dBm
              Retry short limit:7   RTS thr:off   Fragment thr:off
              Power Management:on                                          <<<--- THIS
              Link Quality=51/70  Signal level=-59 dBm
              Rx invalid nwid:0  Rx invalid crypt:0  Rx invalid frag:0
              Tx excessive retries:0  Invalid misc:7   Missed beacon:0
This file provides the temperature of the WiFi chip:
/sys/devices/virtual/thermal/thermal_zone0/temp
rfkill
One-Netbook A1 does not have a hardware rfkill switch. But you can configure software button using the rfkill tool. See toggle_rfkill.sh as example. Software rfkill toggles WiFi and Bluetooth connectivity.
ACPI
In order to handle ACPI events, you need to install the ACPI daemon and add it to the boot runlevel:
emerge -av acpid
rc-update add acpid boot
All ACPI events are configured in the default.sh. Here is a short description of the ACPI events handled by default.sh:
- Power - Generates keycode 192 (XF86Launch0) via
acpi_fakekey, which shows the system info window. You can uncomment one line in the script to turns the system off instead.
- Lid - Suspends to RAM if the display is not turned off via locked via dpms.sh. See lid.sh for details.
- AC plug in/out - Switches cpufreq governor to performance when AC gets connected and to powersave when AC gets disconnected.
Besides the events handled in default.sh, acpid also catches the following ones:
video/brightnessdown BRTDN 00000087 00000000 Kvideo/brightnessup BRTUP 00000086 00000000 Kbutton/volumedown VOLDN 00000080 00000000 Kbutton/volumeup VOLUP 00000080 00000000 Kjack/headphone HEADPHONE plugjack/microphone MICROPHONE plugjack/microphone MICROPHONE unplugjack/headphone HEADPHONE unplug
All multimedia keys generate scancode and are described in the Input section. However, you can write a handler for the respective keyboard events. The main advantage of ACPI hot keys is that they're not dependent on WM (which handles multimedia keys) and work even in console and SDL programs.
You can use the acpi command to monitor the AC and battery information:
    #acpi -abit
    Battery 0: Charging, 85%, 73:00:00 until charged
    Battery 0: design capacity 3947 mAh, last full capacity 3478 mAh = 88%
    Adapter 0: on-line
ACPI does not provide any information about Fan and Cooling. It looks like the Fan can only be controlled by hardware.
CPU frequency scaling
Supported by CONFIG_X86_INTEL_PSTATE The default governor can be selected via options CONFIG_CPU_FREQ_DEFAULT_GOV_*.
Install sys-power/cpupower packages in order to monitor or control frequency scaling:
    # cpupower frequency-info
    analyzing CPU 0:
      driver: intel_pstate
      CPUs which run at the same hardware frequency: 0
      CPUs which need to have their frequency coordinated by software: 0
      maximum transition latency:  Cannot determine or is not supported.
      hardware limits: 400 MHz - 3.40 GHz
      available cpufreq governors: performance powersave
      current policy: frequency should be within 400 MHz and 3.40 GHz.
                      The governor "performance" may decide which speed to use
                      within this range.
      current CPU frequency: Unable to call hardware
      current CPU frequency: 2.72 GHz (asserted by call to kernel)
      boost state support:
        Supported: yes
        Active: yes
Suspending
Suspend-to-RAM
Suspend-to-RAM (aka sleep or ACPI S3 state) is supported by CONFIG_SUSPEND and works flawlessly.
Suspend-to-disk
In order to use native Linux hibernator, you need to enable CONFIG_HIBERNATION and specify your swap partition either in CONFIG_PM_STD_PARTITION or in the resume kernel parameter.
ACPI subsystem in A1 does not generate an event when battery capacity changes. Therefore in order to perform automatic hibernation when battery capacity goes beyond critical level, we need a daemon monitoring the battery capacity level. One simple way to implement this is to use a cron daemon with a simple script checking the battery level.
You can use low_battery_handler.sh to check the battery level and hibernate when the battery level is less than or equal to 3%.
There are various cron implementations available in the Gentoo repository, which slightly differ in configuration. In case of dcron, do the following as root.
    emerge -av dcron
    rc-update add dcron boot
    crontab -e
Add the following line to opened cron configuration file:
* * * * * /usr/local/bin/low_battery_handler.sh
That's it. Your A1 should now hibernate automatically on low battery.
Power Management Utilities
You can use pm-utils package (the power management utilities) in order to run user supplied scripts on suspend and resume. Additionally, you may be interested in the following:
Media card reader
Supported by CONFIG_MMC_SDHCI_PCI. The benchmarks section contains some read/write tests of a microSD card.
Known issues
Benchmarks
Here are few relevant benchmarks:
| Test conditions |
Results |
| Bootup (from EFI boot menu to X11 WM) |
9 sec |
| Suspend-to-disk aka hibernate (linux-5.10.27, only X11 WM, no apps running) |
3 sec |
| Resume from suspend-to-disk (from EFI boot menu, linux-5.10.27) |
7 sec |
| Suspend-to-RAM (linux-5.10.27) |
2 sec |
| Resume from suspend-to-RAM (linux-5.10.27) |
3 sec |
| SSD read speed (One-Netbook PCI-E 256G SSD, hdparm) |
866 MB/s |
| SSD write speed (One-Netbook PCI-E 256G SSD, dd, bs=1M) |
810 MB/s |
| MicroSD card read speed (SanDisk Ultra 128Gb, hdparm) |
38 MB/s |
| MicroSD card write speed (SanDisk Ultra 128Gb, dd, bs=1M) |
18 MB/s |
| WiFi download speed (with AP based on Atheros QCA988x) |
306 MB/s |
| WiFi upload speed (with AP based on Atheros QCA988x) |
95 MB/s |
| Quake 3 (1920x1200, high quality, xf86-video-intel-2.99.917, mesa-20.3.5) |
53 fps |
| glxgears (linux-5.10.27, xf86-video-intel-2.99.917, mesa-20.3.5) |
5000 fps |
| Idle consumption (10% brightness, no wireless) |
2.6 W |
History of changes
June 17 2021
Added a tip how to fix undeclared I2C_DEVICE_ID_GOODIX_0113 error to Kernel section.
May 29 2021
Added link to Mixed DPI and the X Window System in the Video section.
May 23 2021
Added the Virtual keyboard section.
Updated the tray.sh script. It no longer generates XML for OpenBox pipemenu. Now it just generates plain text, which is supposed to be displayed in a terminal emulator.
May 06 2021
Added a note regarding 4k video playback and VLC.
Added a note 3d performance and the lecagy DDX driver.
May 05 2021
First public release.